Wednesday, May 28, 2008

Linux: Using your 3G/CDMA plug-and-play usb modems for mobile broadband


So you recently purchased a USB 3G/CDMA modem for that wireless, anytime anywhere mobile broadband.
Let's see how to use it on Linux.
Most of the linux distros will autodetect the modem. These steps were performed on Ubuntu Gutsy but should work on all flavors.

1. Fire you terminal and run wvdialconf. This should detect your modem and auto generate a config file.
$ sudo wvdialconf /etc/wvdial.conf


2. Open the config file and edit it
$ sudo gedit /etc/wvdial.conf


3. This is how it looks on my system. Add the phone no, username and password as provided by your isp.
[Dialer Defaults]
Init1 = ATZ
Init2 = ATQ0 V1 E1 S0=0 &C1 &D2 +FCLASS=0
Modem Type = USB Modem
Baud = 460800
New PPPD = yes
Modem = /dev/ttyACM0
ISDN = 0
Phone = <>
Password = <>
Username = <>
stupid mode = 1

You might also want to add stupid mode as it disables any prompts from the terminal server and starts pppd immediately after the modem connects.

4. Save the file. Now dial the modem and get connected.
$ wvdial

Great! You are good to go. Easy right! Enjoy surfing.

Tuesday, May 20, 2008

Getting started with Ruby on Rails development on Linux and the perfect IDE

Recently, I forayed into the cool world of RoR and my immediate question was, how to get started and which is the best IDE to start my RoR journey with. I found loads of options and I have decided to list them here for the benefit of others, who face the same problem. I will also detail the installation of the IDE that I am currently using, which I feel is the easiest for newbies to start with.

Installing RoR is downright easy. You first need.. Ruby, which comes readily built in with most of the linux distros. After that you need to get the Rails package which can be either be downloaded from the Ruby on Rails website or from your favorite package manager - apt, Synaptic, yum etc. Just search for Ruby and Rails, and install all the packages.For instance,

$ sudo apt-get install ruby
$ sudo apt-get install rails


Great! Once you have the packages installed, you can set up your first project as follows
$ rails myTestApp


To get your server running to test your stuff, simply run WEBrick server as follows
$ cd myTestApp
$ ./script/server

Great, with the RoR environment set up, you can browse the loads of resource available online to start developing in this framework. There are some really cool screencasts at the RoR website to get you started.

Now the next big question. Which is the best IDE to use?
All the screencasts, tutorials and books I have read, use textmate as their primary editor. Textmate is only available for Mac OS but there are some nice alternatives for Linux.

1. Vi:
Biodegradable Geek has a really nice post about Rails.Vim, a Rails plugin for Vim. I am not a huge fan of Vi but I know a whole lot of folks are.

2. Gedit:
With some nice 3rd party plugins, Gedit can be used as a really powerful editor for Rails. Read here for Textmate-like Gedit in few steps.

3.Aptana/Eclipse with RadRails:
RadRails is an open source IDE for the Ruby on Rails framework that runs on top of eclipse. Easily the most powerful IDE available for Rails development on Linux but it can be a resource hog at times and not recommended for the casual developers.

4. NetBeans IDE 6.1:
The latest version boasts of a really neat integration of RoR. Like eclipse, it does take up a lot of memory resource.

5. Kate:
My favorite editor by far when it comes to C/C++/Java development back in days when I had programming projects in the varsity. I really like the way the console is integrated into Kate.Kate supports syntax highlighting for ruby, rhtml etc.

6. Other Notable mentions:
JEdit, SciTe, FreeRide, NEdit and Bluefish. Click here for the full list

7. My Pick! - Komodo Edit:
Komodo edit is an open source code editor based on the commercial Komodo IDE. It's an excellent alternative for Textmate and includes the project drawer, and (some) auto completion.
As promised, let's see how to get it installed on linux.

1. Download Komodo Edit from the ActiveState website.

2. Extract the package
$ tar xvf Komodo-Edit-4.3.2-1263-linux-libcpp6-x86.tar.gz


3.Install Komodo Edit ( I installed it in /usr/local)
$ cd Komodo-Edit-4.3.2-1263-linux-libcpp6-x86/
$ sudo ./install.sh


4. Create a soft link in /usr/local/bin
$ sudo ln -s "/usr/local/Komodo/bin/komodo" /usr/local/bin/komodo


5. Finally, run Komodo
$ komodo


Well, there are plenty of choices available but the selection of the best IDE rests at the user's familiarity and preference to a certain environment. Hope this article helps you get started with RoR development on Linux. Have fun coding!!

Wednesday, May 14, 2008

Linux: Watching Streaming channels via TVAnts


TVants is a P2PTV application entirely written and designed by Zhejiang University. With the increasing popularity of P2P tv, more and more broadcasters are cracking down on illegitimate public broadcasts of their channels. If one fine day, you find your favorite channel listed off from sopcast, do give Tv Ants a try. It might have it showing up somewhere in its obscure channel list. Unlike sopcast, TV Ants, still doesn't have a working stable Linux application. Let's see how we can get the TV ants goodness on linux.

1. Download TVAnts win32 executable from here.
2. Fire up terminal and install it via wine.
$ wine TvantsSetup.EXE


3. Change to the installed directory (generally in: ~/.wine/drive_c/ path) and launch TVants
$ wine Tvants.exe


4. Search for your channel in the listings and click to play it. A notification pops out "Failed to open channel http://localhost:16900/1.asf". Note down the channel url and Click yes to continue.


5. Now open this url either in your VLC or mplayer. From command line, mplayer or vlc can be run as
$ mplayer http://localhost:16900/1.asf


$ vlc http://localhost:16900/1.asf


6. Enjoy watching the channel!

Monday, May 12, 2008

Linux: Silverlighting your web experience with Project Moonlight


Silverlight is Microsoft's foray into building interactive Rich Internet Applications. Microsoft has been pushing hard at getting the developer community, adopt this new framework but faces stiff competition from Adobe Flash and Flex which have a huge developer base.

Having said that, the Silverlight website showcases some amazing applications that are powered by this new framework. Analysts believe a new mobile version will be out soon which will make it a stronger competitor to the existing Flash Lite framework.

Microsoft has released browser plugins for Windows and OS X but it's not a surprise that Linux was left out, as usual. Here’s where Moonlight comes in for the Linux world..

Building on the Mono Project’s Linux implementation of the dot Net framework, Moonlight aims to provide both a Linux SDK to build Silverlight apps and a stand-alone Silverlight runtime.

To get started, firefox plugins for Silverlight are available at the Moonlight page. Firefox3 support is available in their experimental builds.


I tested it with some popular pages with mixed results. My favorite app is Microsoft Popfly, especially the mashup tool. Unfortunately, it crashes quite often and understandably, it's one of the more complex implementations of Silverlight around.


Bugs apart, it's definitely a praisable attempt to make an open source implementation of Silverlight and I hope in coming times, we'll see a more enriching and exciting Silverlight experience, right here on Linux.

Friday, May 09, 2008

Linux: Great GUI tools for MySQL


MySQL is definitely one of the leading opensource database projects around and mainstream companies like google and yahoo have successfully incorporated MySQL into their highly powerful and scalable server platforms. LAMP stacks are increasingly becoming popular and MySQL is a great tool for beginners and students to learn databases. As much as developers and server admins love their SQL, it always helps in having GUI tools to make the process more efficient, faster and simplified.

There is a misconception that free tools for this purpose aren't available for Linux. Here I'll describe 3 tools to make our lives easier.
1. MySQL Administrator/Query Browser

MySQL Administrator is a powerful visual administration console from the MySQL folks that enables users to easily administer their MySQL environment and gain significantly better visibility into how their databases are operating. It integrates database management and maintenance into a single, seamless environment, with a clear and intuitive graphical user interface. With tonnes of options to administer, monitor, troubleshoot and replicate, it's a must have for all MySQL database admins.

MySQL Query Browser is an easy to use visual tool for creating, executing, and optimizing SQL queries for your MySQL Database Server. The MySQL Query Browser gives you a complete set of drag-and-drop tools to visually build, analyze and manage your queries.


Both of the above mentioned tools are available in all repositories. Fire your yumex or synaptics to find and install the packages. It's also available at the MySQL website. Download it from here.

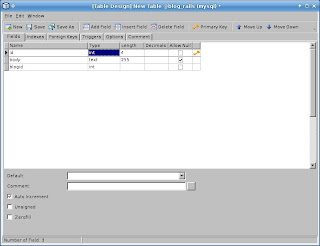
2. Navicat for MySQL


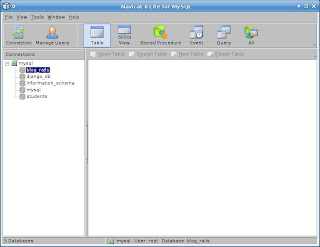
Navicat MySQL is a popular MySQL GUI tool for windows. It is a paid software but boasts of 100s of features in it's latest release. As we are just covering free tools, A lite version is available for non commercial use here.


It seems that the folks at Navicat didn't want to spend their time developing a native application for linux. Hence, the package is pre comipled with wine.
It still works great.


No need to install the package. Just download and extract package, and run the start_navicat binary.

$ ./start_navicat

3. SQLyog MySQL GUI - Community Edition


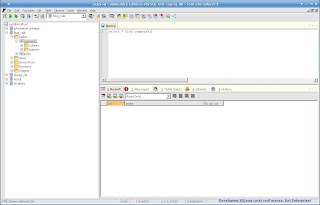
SQLyog community edition, is a stripped down but really nice and open source version of the SQLyog enterprise edition. According to softpedia, there is a native linux version of the software, but it directs to an invalid link.The windows binary can be downloaded from here.


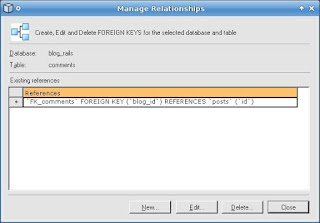
The version installs easily via wine and looks pretty stable. It is probably the easiest of the all 3 tools discussed here and I really like the way relationships are managed in SQLyog.


Download the windows binary and install it via terminal:
$ wine SQLyog654.exe

The official MySQL Gui tools are really good but not as feature rich as the latter two. With a unified interface to manage and monitor the MySQL environment, the choice of which to use is left completely to the end user. One thing to note, the free editions do lack some features. So if you really liked them, do support the project and buy their enterprise editions.
Enjoy your MySQL experience!

Sunday, May 04, 2008

Make a feature rich Facebook app in 10 mins with absolutely no coding


Facebook apps can be quite troublesome to build. Even if you want just a bare minimum app that just displays simple photos, you need to learn a framework, write lines of code in PHP/Python/Ruby/..
Here let me show you how to build a fully hosted app within 10 minutes. And with absolutely no coding involved. This technology is provided by Dapper. They have this really cool service that lets you build dapps (dapper xml applications) from any RSS or live web feeds.

I built my first facebook app - Cricket Updates using dapper's facebook app maker. It started off as an test app but a lot of people still use it. I hope to update it soon since I have a lot of time now.

Now let's get going, shall we. For the tutorial, we'll be making an F1 updates app, that will give the users, access to latest constructor standings, race news, pics and results. Each of these will be separate dapps which will be integrated into our facebook app.


1. Get yourself a dapper account by registering at their website.

2.Click on "Create new app" to create your first dapp. Dapp Factory page will load.

3. My first dapp will contain the latest F1 headlines. Click on the "In an existing RSS feed" tab and enter the address of rss feed. Select dapp xml and click next.


4. Select the items in the feed you wish to keep and click on next.


5. Now save your app.


6. Congrats, your first app is created. Let's create another dapp, this time a little more complex. Go to dapp-factory again.

7. Enter the url of the image gallery found on the F1 website and click next.


8. Now dapp will start collecting pages. You can add similar pages and click on "add to basket". Dapper will look at the page structure and deduce different items in the page. I am just adding one page here.


9. Next page, dapper will ask you to select the items in the page. Click on an image, and dapper will automatically collect all the images.


10. Click on save field and save it as "pics". Repeat the process if you wish to collect other fields like text and stuff. Once you have collected all the items, go to the next step.

11. In this page, you can group items together in groups. I have just pics so just group them as pics or just go to next step.


12. Now save the dapp and preview it.


13. I think that should be enough. Let's make our facebook app. Go to Facebook app maker. Add the created dapps into it and click "next step".


14. Give a nice banner, profile footer image etc. and move on.


15. In the configure dapps section, select the items in each dapp which you wish to display. Once you are happy with the selection, go to the next step.


16. We are almost done. In this page dapper explains how to get an api key from facebook and integrate your newly create facebook app with dapper. Follow the steps with care. Remember to add a "/" at the end of your call-back url and also select that option that allows users to add it to their profile page.


17. Once you are done, click on save. Dapper will do the rest. Once it has set up, it will ask you to install it on your profile.


18. Enjoy and share your newly created facebook app.


Using this method, you could create dapps for point standings, latest race etc. Just edit the facebook app from your dapper profile page and add more dapps to it. It's that easy. Do note that rss feeds don't get updated and reflected back that fast; hence, there will be a updation delay in your facebook app. You are also restricted to content that dapper currently supports. So no flash games, streaming music and stuff. But still Dapps are really powerful. You can pipe in outputs of one dapp into other and so on. Dapper website provides nice screencasts for all these features. Rss feeds can be manipulated using yahoo pipes to create even more useful and customized feeds. A yahoo pipes tutorial will be covered later in future.

If you liked this article, do support Dapper. They are an amazing service and hope they continue on this really cool work.

Exams are over. Let's start blogging....


I haven't had the time to post new articles as I was busy with my final year exams. Now they are officially over and hopefully I should be graduating by end of june. Till then, It's a long break. If anyone has any requests, do drop them off here. I have loads of time now to cover them.
And, thanks for reading my blog. It does encourage me to keep writing.,

--Anoj

Friday, May 02, 2008

KDE4: Getting GTK apps to look just right


I use KDE4 and Gnome interchangeable and I like them both.
One immediate thing that you'll notice once you shift to KDE4 is that the gtk2 applications like Gimp, VLC, Firefox and Eclipse don't look the way they should.

Here let me show you how to make KDE and gtk applications look consistent and look good.

1. Download gtk-kde4. Alternatively, download the binary package.

2. Extract the contents into some folder. Fire your terminal, change to that folder and copy certain files from the extracted package to the KDE base folder. On my system, the kde4 path is "/usr/lib/kde4". To locate KDE path, just do

$ locate /lib/kde4


$ sudo cp kcm_gk4.so /usr/lib/kde4/lib/kde4/
$ sudo cp kcm_gk4.desktop /usr/lib/kde4/share/kde4/services/
$ sudo cp gk4icon.png /usr/lib/kde4/share/icons/


3. Launch systemsettings and click on "Appearance" under the General tab
$ systemsettings


4. You'll find a new section for GTK style. Select your favorite style and click on apply.


5. Now launch your favorite gtk2 apps and see the difference!


Have fun with KDE4 !