Thursday, January 31, 2008

Improving your google Reader


Bloglines and Google Reader are my 2 favorite rss readers.
Bloglines Beta definitely looks and feels better than google reader, but I find google reader more optimized to handle volumes of feeds.

Here is a nice Firefox addon to improve your google reader. Checkout this lifehacker exclusive download.

And here is the rest of it.

Gliffy : An online visio killer?


Since the time I shifted to linux, I have always missed Visio. There are some nice linux alternatives like Kivio and Draw but I still find them buggy and a little painful to use. I just need some tools to draw simple ER or UML diagrams for school software engineering projects.

Enter Gliffy, an online visio.. alternative that is not rich on features but enough shapes and diagrams for all your software engineering and basic designing needs. It also has nice collaborative and sharing functionalities and an easy html embed/publish option. I also like the revision history tracking function.


Is it a visio replacement?
Unfortunately no. It still has a lot of quirks. For instance, the keyboard shortcuts didn't work as expected and the Shape templates are quite limited
Overall it is really good start. The basic version serves all my needs and I plan to stick to it for a while.

Do leave your comments on other visio alternatives that you use. Maybe I can review them together.


Saturday, January 19, 2008

Ubuntu Gutsy: Synchronizing Google Calendar with your Nokia phones using opensync on bluetooth


This is a follow up on my older post - Synchronising your calendars with google Calendar, where I described an easy way to sync your phone calendar with your remote google calendar. Quite a lot of folks wanted an alternate way. An ability to sync over bluetooth or usb, when your phone has no access to internet.


Note: This was tested in Gnome using the gnome bluetooth libraries.
For simplicity, let me break down the process into some discrete steps.

StepA: Installing bluetooth libraries

1. Get the gnome-bluetooth library using apt
sudo apt-get install gnome-bluetooth

2. Restart bluetooth
sudo /etc/init.d/bluetooth restart


StepB: Pairing your phone with your laptop

1. Pairing is really really important. Don't proceed to next step without completing this.

2. In your linux pc, check if you can discover your phone
sudo hcitool scan

A six octet number like (00:12:D2:2E:22:1E), which is the MAC address of your phone will be displayed. Note it down somewhere.

3.Change hcid.conf option
sudo gedit /etc/hcid.conf

and replace security user; to security auto;
4. You can also specify a PIN no. if you want

5. Restart bluetooth services

6. Now,In your phone, go to your bluetooth settings > Paired devices. Add a new paired devices (your PC) and set it as authorized. It might prompt you for a PIN if you had specified it earlier.

7. Now verify if the pairing works. (Type this in terminal as normal user)
nautilus obex://

You should now be able to browse your phone.


StepC: Getting the opensync libraries


1.Add following repositories to /etc/apt/sources.list:
sudo /etc/apt/sources.list

and add these lines to the file
deb http://opensync.gforge.punktart.de/repo/opensync-0.21/ feisty main
deb-src http://opensync.gforge.punktart.de/repo/opensync-0.21/ feisty main


2. Add the keys to the repo by typing these in the command line
gpg --keyserver hkp://subkeys.pgp.net/ --recv-keys CB210090B029CB84
gpg --export CB210090B029CB84 | sudo apt-key add -


3. Get the packages using apt
sudo apt-get install opensyncutils opensync-plugin-evolution opensync-plugin-syncml opensync-plugin-google* multisync-tools multisync0.90


StepD: Creating new sync profile on your phone

1. Go to Menu > Connectivity > Sync (depending on your phone)

2. Select Options > New Sync profile. This will create a new sync profile similar to the PC Suite profile.

3. Edit this new sync profile similar to this :

Sync profile name: PC

Applications > Just select Calendar

Connection settings >
Server version: 1.1
Data bearer: bluetooth
Host Address: PC
Username : None
Password: None
Allow Sync requests: Yes
Accept Sync requests: Yes


4. Remember the profile name.


StepE: Finding your Nokia SyncML Server channel number


1. Use the sdptool to discover services and their channel numbers.
sdptool browse | grep more


2.This is what I get.

Service Name: Nokia SyncML Server
Service RecHandle: 0x1000a
Service Class ID List:
UUID 128: 00005601-0000-1000-8000-0002ee000001
Protocol Descriptor List:
"L2CAP" (0x0100)
"RFCOMM" (0x0003)
Channel: 13
"OBEX" (0x0008)
Language Base Attr List:
code_ISO639: 0x454e
encoding: 0x6a
base_offset: 0x100
Profile Descriptor List:
"" (0x00005601-0000-1000-8000-0002ee000001)
Version: 0x0100


3. Note the channel number, (13 in this case)


StepF: Configuring multisync

1. Launch multisync
multisync0.90


2. Create a new group, say NokiaGCal (click on add)

3. Click on edit and add google-calendar and syncml-obex-client as members to this group. They should be visible if all packages have been installed correctly in previous step.

4. Edit the settings for the google-calenar by replacing USER with your google username and Password with your google account password. (note. there are 2 USER tokens and 1 password token that need to be replaced)

5. Edit the syncml-obex-client settings as follows

<?xml version="1.0"?>
<config>
<!-- (Only for bluetooth) The bluetooth address if the bluetooth mode is selected -->
<bluetooth_address>00:12:D2:2E:22:1E</bluetooth_address>

<!-- (Only for bluetooth) The bluetooth channel to use. `sdptool browse $MAC` to search for the correct channel -->
<bluetooth_channel>13</bluetooth_channel>

<!-- (Only for USB) The usb interface number of the SYNCML-SYNC target. use syncml-obex-client -u (you will need access to the USB raw device) to find it. -->
<interface>0</interface>

<!-- The string that the plugin will use to identify itself. Some devices need a special string here. -->
<identifier>PC</identifier>

<!-- The syncml version to use: 0 for 1.0, 1 for 1.1 and 2 for 1.2 -->
<version>1</version>

<!-- if the plugin should use wbxml -->
<wbxml>1</wbxml>

<!-- The username to use. Leave empty to not require a username -->
<username></username>

<!-- the password for the username -->
<password></password>

<!-- sets the connection type to use. 5 means obex over usb, 2 means obex over bluetooth -->
<type>2</type>

<!-- If wbxml is enabled, defines wether the wbxml should use string tables -->
<usestringtable>0</usestringtable>

<!-- Never send ADD command, but send REPLACE (not needed normally) -->
<onlyreplace>0</onlyreplace>

<!-- Workaround around for mobile phones which only use local timestamps and _no_ UTC timestamps! -->
<onlyLocaltime>0</onlyLocaltime>

<!-- Sets the maximum allowed size in bytes of incoming messages (some device need this option set). Example: 10000 -->
<recvLimit>10000</recvLimit>

<maxObjSize>1000</maxObjSize>

<!-- The name of the contacts db. Must be the same as the phones sends -->
<contact_db></contact_db>

<!-- The name of the calendar db. Must be the same as the phones sends -->
<calendar_db>Calendar</calendar_db>

<!-- The name of the note db. Must be the same as the phones sends -->
<note_db></note_db>
</config>


6. Replace the bluetooth and channel tags with your bluetooth MAC address and channel as discovered in previous steps.


StepG: Finally time to sync


1. Click on refresh against your group to start the sync.

2. If all goes well all your contacts are now syncronized with your google calendar.


Passing Remarks

Phew...Long article. Long process. But this is the basics of syncing a lot of stuff with your phone and other devices. Now you should be able to do an on the fly sync with google calendar using your laptops bluetooth for your phone. You can also sync evolution, sunbird/thunderbird etc contacts and calendar using the relevant plugins
Some other articles to help you..

http://www.ugov.be/wiki/index.php/Ubuntu_with_Nokia_E65
http://ubuntuforums.org/showthread.php?t=260676

Monday, January 14, 2008

Linux sudo tip : Creating a new super user with admin rights in Linux


Before all you linux fanatics start shooting at me for misusing sudo in this article, let me make a confession here. More than once I have felt the need for multiple accounts with root like privileges and it is really painful to understand and modify sudo for this simple purpose. It is not a unique issue, especially new users who have just migrated from the world of Windows. We are so used to administrative and debugger privileges.

Here I'll show you a quick way to create a new superuser who has almost all rights as the root and you don't really need to understand how sudo works.


1. Let us start. Let us create a new user called root2 first
useradd root2
passwd root2


2. Next stept. If you guessed that it has something to do with modifying sudoers file, you are right.
Modify /etc/sudoers using the visudo which is a sudoers file editor and syntax checker.

sudo visudo


2.Go down to the line # User privilege specification‘ You should see root ALL=(ALL) ALL

and add this line after that
root2 ALL=(ALL) ALL


3. Next, you need to add around 50 lines of code. Nah, just kidding. You are done.
Restart and test your power. Now you can sudo and run anything without the need for the root password or any explicit permission.

4. Please do note, with great powers comes great responsibilities. There is a reason why Linux has the concept of root. If you have more time, I would suggest reading the following article to get more finer control on restricting access of specific commands to users and groups.

For more details on sudo: Do look at this article

Sunday, January 13, 2008

Disappearing Panel in KDE 4


KDE 4.0 is still buggy. Plasma crashes a lot and quite surprisingly the applications panel disappears. No worries, let me show you how to bring the panel back.


1. First, kill/close the plasma process. One easy way is to cntrl + escape, search for plasma and kill it.

2. Your desktop disappears. Press Alt + F2, to bring in the kicker and launch the terminal.

3. Delete the plasma configuration file and relaunch plasma
rm ~/.kde4/share/config/plasma*


2. Voila!! Panel is back.
Sad part is you need to reconfigure your desktop, icons and widgets.

PS: Do read the Emergency release notes FAQ and the KDE 4 visual guide


Saturday, January 12, 2008

Installing the new KDE4 in Ubuntu Gutsy


KDE 4.0 just got released. Like everyone I had been waiting anxiously for the release, quite often tempted to try the release candidates, but now time to test drive. Let me quickly show you how to install it in your Gutsy Gibbon (Ubuntu 7.10)


1. Add deb http://ppa.launchpad.net/kubuntu-members-kde4/ubuntu gutsy main to your /etc/apt/sources.list.

sudo gedit /etc/apt/sources.list


2.Get the kde4-core using apt
sudo apt-get install kde4-core


3. Press 'y', wherever needed. It might take some time for apt to get the new packages.

4. Once everything is done, KDE4 should be available in the login manager.

Some initial previews:


Tuesday, January 08, 2008

Windows XP Tip : Instant Workstation Lock

Worried of your boss snooping over and finding out what you were watching on youtube.
Do you always forget locking your Windows PC, for that unavoidable nature's call?
Here is a tip to quickly lock your workstation.

You can also lock your XP workstation with just two clicks of the mouse. Follow these steps:


1.Create a new shortcut on your desktop using a right mouse click, and enter 'rundll32.exe user32.dll,LockWorkStation' in the location field.


2.Give the shortcut a name you like.

That's it -- just double click on it and your computer will be locked.

And if that's not easy enough, Windows key + L will do the same.

For more tips: visit here

Src: Kondadi Pranama Moorthy and his StumbleUpon

Monday, January 07, 2008

Windows XP Tip : Solving the frequent network disconnects

This is a common problem for folks with more than 1 network connection - Ethernet LAN, WLAN etc. This is what happens: You login to windows, you happily get an IP, start browsing the net and suddenly the IP refreshes. You think its an one off incident, and few mins later, it again refreshes. This continues on and on and now you can't watch those online videos, play LAN games, listen to radio etc.

Here is the solution.


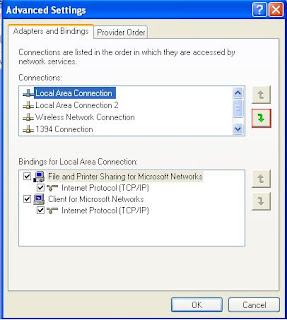
When you have more than 1 network interfaces, windows assigns them priority. For eg.
1. WLAN eth1
2. LAN eth0

So when you are at home connected to your LAN port, it constantly searches if any wifi network is available. It sends a dhcp request for all the interfaces and you get a new IP back.
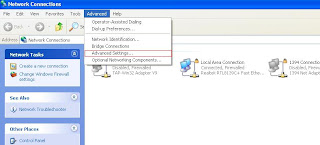
To solve this, just change the priority.


Simple right. On Linux it doesn't happen, but then that's an entirely different story for later.